Computer programs that are able to automatically identify features in images have been shown to be very useful compared with manually attempting the same thing. This is especially true when there are large numbers of images to examine. In addition, identification of linear features in images for the purposes of analysis or masking them out has many applications.
In order to create a function that will do this, we need to understand exactly what a linear feature is. First, a ``feature'' is an object in an image that has a high enough S/N ratio to be detected. Second, the intensity distribution is such that pixels which make up the feature are located adjacent to one another or have some other kind of distinguishable pattern. A feature is ``linear'' if these pixels all fall on a line of some width and length.
With these definitions, the Hough Transform is adequate to search for colinear lists of pixel locations and a simple adjacency algorithm is suitable to check for the proper position distribution.
In order to automatically detect linear features, the first step is to
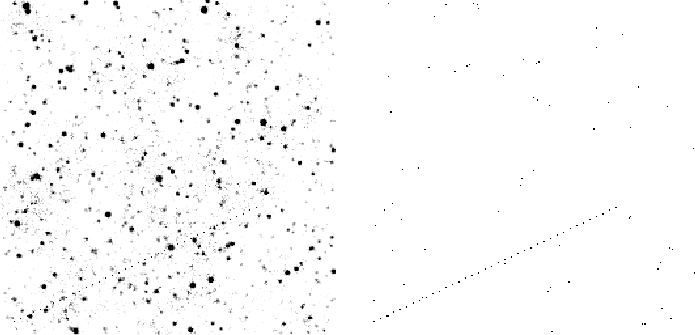
select pixels in the image (Fig. 1, left panel) that
fall within a given data value range. The input image is assumed to
already be dark subtracted and flattened. The user has the option of
selecting one or more ranges if it is determined, for example, that
some features will be bright and some will be faint. Each data value
range can either be computed from the minimum and maximum data values,
in terms of evenly spaced ![]() ranges above the mean, or in terms
of evenly spaced data value ranges. The user must specify the number
and the type of ranges desired.
ranges above the mean, or in terms
of evenly spaced data value ranges. The user must specify the number
and the type of ranges desired.
For each data range, a list of pixel locations (x,y coordinates) is created and fed into the Hough transform (Fig. 1, right panel). The Hough transform converts these pixel locations into a new parameter space given by the equation:
| (1) |
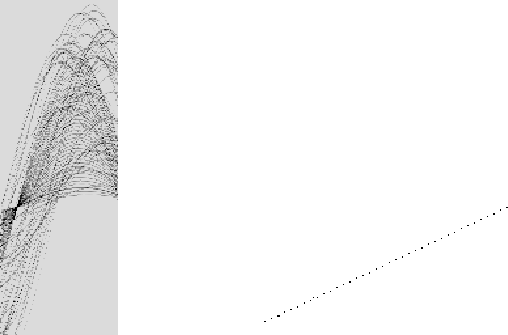
Each pixel location (an x,y pair) is therefore represented as a curve
(Fig. 2, left panel) in this new parameter space
corresponding to the above equation. In this parameter space, the
x-axis is ![]() and the y-axis is
and the y-axis is ![]() .
.
Pixels in image space that are aligned with one another will have curves that intersect a one particular point in parameter space. The task creates an ``image'' in parameter space by accumulating these curves and stacking one on top of another. Naturally, points of intersection will have larger values than other points.
Once a parameter space image is created, a simple peak finder will locate the highest peak. The highest value in parameter space corresponds to the maximum number of selected colinear points in image space. The value at that peak corresponds to the number of pixels in image space that are aligned. The location of the peak in parameter space is used to ``backtrack'' to find the image space pixels that correspond to that peak. Typically, a parameter space image will have several peaks. Each peak corresponds to other locations in image space where pixels have lined up. This fact can be exploited to search for features that are of any user-specified length.
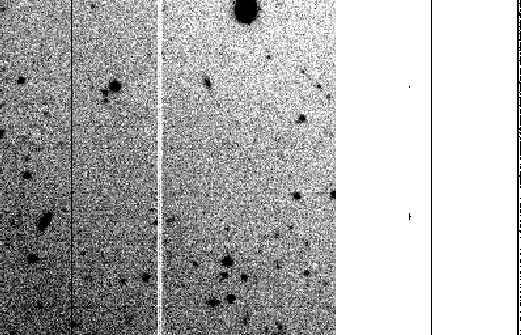
Another aspect of extended linear features is that the image space pixels that describe them are in some way adjacent to one another and have a minimum and maximum length. Undoubtedly, there will be pixels that do not correspond to the feature but are still part of a colinear set. Once such a set is found, the list of pixel locations is sent to an adjacency calculator to determine if a suitable number of them are next to one another. This is where the next set of user-specified parameters comes into play. First, the distance between adjacent pixels must be smaller than a given separation. Second, the length of the feature must fall between a minimum and maximum number of pixels. If all conditions are met, a feature has been positively identified (Fig. 2, right panel). Figures 3 and 4 show other examples of this method.
There was a desire for this task to go beyond just identification by actually doing some simple analysis of the features themselves. First, information about the feature (beginning and ending pixel location, length, position angle, mean intensity and standard deviation) is written to an output file. Second, the user can also optionally create profile plots of each feature and either have them appear inside their xgterm window or saved as IRAF graphics metacode files to be examined at a later time. Third, and probably most useful, is that a binary mask (a pixel list file) is created that can then be used by other IRAF tasks as a region identifier for interpolation or other masking purposes.